
Creating an Employee Entity
Create a JPA entity representing an Employee.
An Entity is a Java class representing data you want to insert into a database. For our application, we will create an Employee entity that we will use to insert Employee data into an Employee table in our database.
In the Project tool window, we'll navigate to our src/main/java directory, select the com.jetbrains.springdatajpaapp package and press ⌘N (macOS) / Alt+Insert (Windows/Linux). Choose Java Class and then type in our entity name - Employee. Then, press ⏎ (macOS) / Enter (Windows/Linux).
In the Employee class, we'll make it an entity by adding the @Entity annotation to our class definition and importing the javax.persistence.Entity package. Once you do that, you'll notice an error in your class.
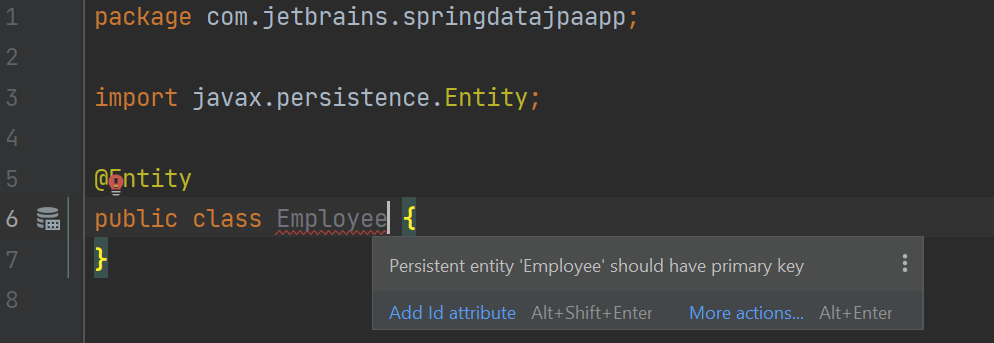
As the error message indicates, entities must have a primary key which is specified by having a field annotated by the @Id annotation. We'll use the ⌥⏎ (macOS) / Alt+Enter (Windows/Linux) shortcut so IntelliJ IDEA can add the ID for us which will result in a prompt to enter the ID field's information. We'll take the default Name and Type. You can select the Field Access checkbox (I prefer annotations on fields instead of the setter methods because I find it more readable). You can also select the Generated checkbox so you don't have to assign Employee Ids yourself.
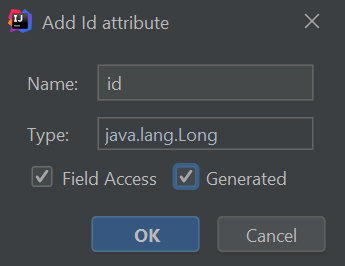
Then, we'll click OK. You'll notice that IntelliJ IDEA creates an id field with its setters and getters.
Next, let's add a couple of String fields: firstName and lastName.
Next, we'll generate our constructors by bringing up the Generate menu ⌘N (macOS) / Alt+Insert (Windows/Linux) and select Constructor. We don't need the constructor to take in an id because ours will be generated so we'll click on firstName then hold down ⌘ (macOS) / Ctrl (Windows/Linux) and select lastName.

Then, we'll click OK.
You'll now notice that you have an error on your Employee class because you don't have a no-arg constructor. If you press Alt+Enter (Windows/Linux), or ⌥⏎ (macOS), on the error, IntelliJ IDEA offers to create it for you - let's go ahead and do that.
Next, we'll generate our field's setters and getters. We'll bring up the Generate menu ⌘N (macOS) / Alt+Insert (Windows/Linux) and select Getter and Setter. We'll hold down ⌘ (macOS) / Ctrl (Windows/Linux) and select both variables. Then, we'll click OK. IntelliJ IDEA generates the getters and setters for both variables.
Finally, let's generate a toString method by bring up the Generate menu again ⌘N (macOS) / Alt+Insert (Windows/Linux) and selecting toString. We'll keep all the fields selected and click OK.
End Result
Your final Employee entity should look similar to this (formatting may vary):
package com.jetbrains.springdatajpaapp;

import javax.persistence.Entity;
import javax.persistence.GeneratedValue;
import javax.persistence.Id;

@Entity
public class Employee {
    @Id
    @GeneratedValue
    private Long id;
    private String firstName;
    private String lastName;

    public Employee() {
    }

    public Employee(String firstName, String lastName) {
        this.firstName = firstName;
        this.lastName = lastName;
    }

    public void setId(Long id) {
        this.id = id;
    }

    public Long getId() {
        return id;
    }

    public String getFirstName() {
        return firstName;
    }

    public void setFirstName(String firstName) {
        this.firstName = firstName;
    }

    public String getLastName() {
        return lastName;
    }

    public void setLastName(String lastName) {
        this.lastName = lastName;
    }

    @Override
    public String toString() {
        return "Employee{" +
                "id=" + id +
                ", firstName='" + firstName + '\'' +
                ", lastName='" + lastName + '\'' +
                '}';
    }
}